Hi guys! Recently I showed you the first makeup look in my makeup challenge series. I have also made a photo tutorial for you, in case you wanted to try it out yourself.
Let's go!
The first thing I did was use Maybelline's Color Tattoo on my lid as a base. This colour is called "Permanent taupe". Darker brown colours would work fine as well.
Next I grabbed my MAC eyeshadow in "Honey Lust", a shimmery gold colour. I used a sponge applicator for this because I thought it would be easier to apply. If you don't have a sponge applicator, you can use a brush and wet it a little or spray a little bit of MAC's Fix+ on it.
I applied it right over the taupe base in patting motions.
Next I grabbed my MAC "Texture" eyeshadow. With a thin crease brush I applied this above my crease, slightly blending it out. I didn't blend too much though, I want the colour to peak through.

Next I went in with another colour by MAC called "Bronze". I applied this in the crease using a crease/blending brush. I blended it out into the orange colour.
That's where my Catrice palette in "Before or after eight" comes in. I used this darker colour on the right for my outer V. I used the crease/blending brush that I used for "Bronze" as well. I blended it out to make sure there were no dark, harsh lines.
Time for highlighter! I'm using my go to highlight colour by NYC called "Basic Instinct".
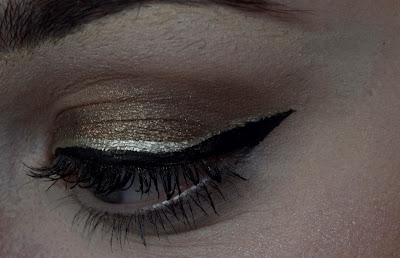
Time to blend a little more if needed, curl lashes and apply mascara! Here's the finished look!
Thanks for watching! Let me know if you liked it!
Have a great day!


.jpg)


